There are plenty of examples of Scratch programming and MicroBit programming available on sites referenced on the Scratch page. I am using a STEAM + AI approach to design a larger Scratch project and a lesson plan. The aim is to illustrate the type of project that can be undertaken using Scratch and illustrate how AI can help in creating lesson plans.
Although there are numerous examples of Scratch and MicroBit programming, there is little available that combines the two in a SEAM project. Therefore, before looking at a more complicated lesson plan it is worth looking at a simple Scratch and Lego Boost plan. I created the plan using using Magic School.
https://app.magicschool.ai/tools/lesson-plan-generator?share=9982006e-5d0a-4b19-b607-ee6f4c1e9db5
Scratch and Robotics Lesson Plan.
While it’s technically possible to control MicroBits and MicroBit-powered robotics using Scratch on a Raspberry Pi, the process can be quite complex. A much simpler and more flexible approach is to use Scratch through Mind+, which supports most MicroBit commands—including wireless communication between multiple MicroBits.
With this setup, you can create animations in Scratch that interact in real time with a control MicroBit. That MicroBit can then wirelessly coordinate a variety of robotic and electronic devices. In larger projects, multiple MicroBits and devices can perform different tasks, talk to each other, and respond to the Scratch animation—all working together as part of a dynamic system.
Programming note: The control MicroBit is programmed using Mind+, while additional MicroBits can be programmed using MakeCode.
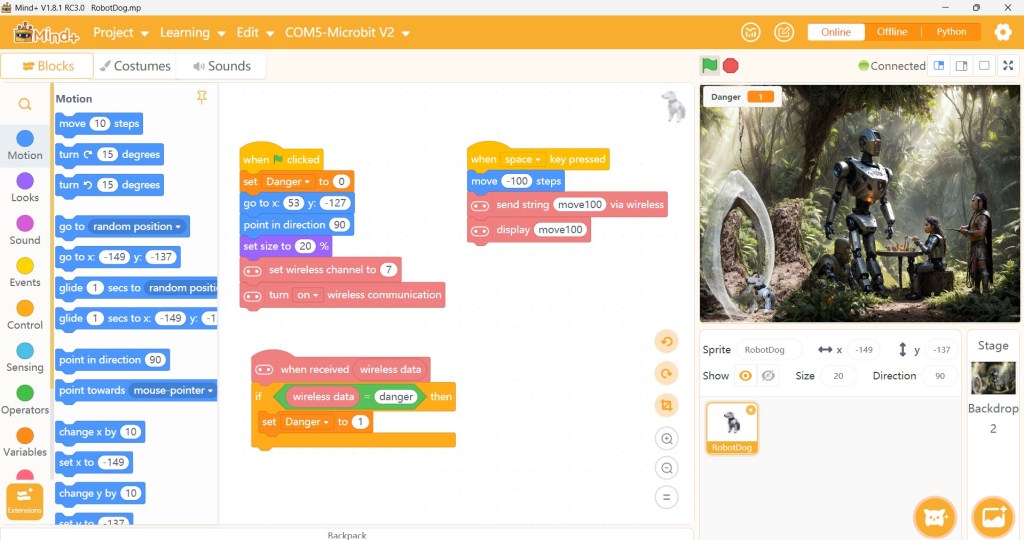
Before diving into a full-scale project, it’s wise to start with a simple test program to confirm that all key components—Scratch, Mind+, and the MicroBits—are communicating correctly. The image below shows an example: Scratch running through Mind+, with two MicroBits exchanging data and interacting with the animation.
The illustration above was based on an adventure story that I had written for children, with the support of AI. However, we can use the same approach with a very different theme for a School or Code Club. I will use Copilot and Magic School to create a lesson plan.
Create a lesson plan for a class of 20 children aged 14. It is a STEAM + AI, project based on the use of Scratch and MicroBits. The children will work in groups undertaking different activities, however they will regularly move between teams to gain experience of all activities. The project covers environmental monitoring in an African Nature Reserve. The Arts group will create a interesting background image and sprites in the form of native wildlife. They will also produce a story based on the images. The Programming group will create a Scratch program, running on Mind+, that uses the images. The program will also communicate with a MicroBit that provides an interface between the Scratch program and two other Microbits. Two Robotics groups will design, build and program the two MicroBits. One Microbit will drive a small robot car looking for wildlife. It will use an AI camera to identify them. The second Microbit will monitor the environment monitoring temperature, air quality and soil moisture levels.
🧭 Lesson Plan: Wildlife Watchers – STEAM + AI in an African Nature Reserve
🎯 Age Group
14-year-olds (mixed abilities)
👥 Class Size
20 students, working in rotating groups
🕒 Duration
5 sessions (each 90 minutes), plus optional showcase day
🌍 Project Overview
Students will collaboratively build an interactive Scratch animation that simulates environmental monitoring and wildlife tracking in an African Nature Reserve. Using MicroBits, sensors, and an AI camera, they’ll explore how technology can support conservation efforts. Each student will rotate through four themed groups to gain experience in:
- Art & Storytelling
- Programming & Interface Design
- Robotics: Wildlife Tracker
- Robotics: Environmental Monitor
🧩 Group Roles & Activities
| Group | Focus | Tools | Output |
|---|---|---|---|
| 🎨 Arts & Storytelling | Design background and wildlife sprites; write a story | Scratch graphics editor, paper sketching, digital art tools | Illustrated nature reserve scene + wildlife sprites + story |
| 💻 Programming | Build Scratch program in Mind+; connect to control MicroBit | Scratch via Mind+, MicroBit | Interactive animation that responds to sensor data |
| 🤖 Robotics A | Build robot car with AI camera to detect wildlife | MicroBit, robot chassis, AI camera | Mobile robot that identifies animals and sends data |
| 🌱 Robotics B | Build environmental monitor (temp, air, soil) | MicroBit, sensors (DHT11, MQ135, soil moisture) | Stationary sensor hub that sends readings to Scratch |
🗓️ Session Breakdown
Session 1: Kickoff & Exploration
- Objective: Introduce project, form groups, explore tools
- Activities:
- Brief on African Nature Reserves & conservation tech
- Demo Scratch + MicroBit + sensors
- Group formation & role assignment
- Begin sketching ideas and exploring tools
Session 2: Group Work Begins
- Objective: Start building group-specific components
- Activities:
- Arts: Design background + wildlife sprites
- Programming: Build Scratch interface, test MicroBit connection
- Robotics A: Assemble robot car, test movement
- Robotics B: Connect sensors, test data collection
Session 3: Rotation & Integration
- Objective: Students rotate to new groups; begin integration
- Activities:
- Rotate students (e.g., 5 per group swap)
- Programming group connects to both MicroBits
- Robotics A tests AI camera detection
- Robotics B sends sensor data to Scratch
- Arts group refines sprites based on feedback
Session 4: Final Build & Testing
- Objective: Complete builds, test full system
- Activities:
- Finalize Scratch animation and story
- Test communication between all MicroBits
- Debug and refine sensor readings and AI detection
- Prepare for showcase
Session 5: Showcase & Reflection
- Objective: Present project, reflect on learning
- Activities:
- Each group presents their contribution
- Run full simulation: Scratch animation responds to real-time data
- Reflect on STEAM + AI learning
- Discuss real-world applications in conservation
🧠 Learning Outcomes
- Understand how AI and robotics can support environmental monitoring
- Gain hands-on experience with Scratch, MicroBits, and sensors
- Develop storytelling and visual design skills
- Practice collaboration, rotation-based teamwork, and problem-solving
- Explore ethical and practical implications of tech in nature
🧰 Materials Needed
- 3 MicroBits per team (total ~12)
- Robot chassis + wheels (for Wildlife Tracker)
- AI camera module (e.g., HuskyLens or similar)
- Sensors: temperature (DHT11), air quality (MQ135), soil moisture
- Laptops with Mind+ and Scratch
- Art supplies or digital drawing tablets
- Projector or screen for showcase
🌟 Extensions & Adaptations
- 🌐 Connect with a school in Africa or New Zealand for shared data or stories
- 📖 Turn the final project into a digital storybook or comic
- 🎥 Record a short documentary-style video of the project
- 🧪 Add data logging and graphing for science integration
can we update the robots parts list. The Wildlife Tracker will use a Kitronik Robotics Board to control 4 motors driving the Tracker, and 4 servos on a MeArm robot arm. A Huskylens vision sensor is attached to identify wildlife. The other environmental monitor is based on a kitronik Air Quality Board, with a moisture monitor attached.
🔧 Updated Robotics Parts List
🤖 Wildlife Tracker Robot
Purpose: Navigate the nature reserve and identify wildlife using AI vision
Controlled by: MicroBit + Kitronik Robotics Board
Components:
- 🧠 MicroBit (primary controller)
- 🛞 Kitronik Robotics Board
- Drives 4 motors for movement
- Powers and controls 4 servos on a MeArm robot arm
- 👁️ HuskyLens Vision Sensor
- AI-powered object recognition to identify wildlife sprites
- 🔌 Power supply (battery pack or USB)
- 🔩 Robot chassis, wheels, mounting hardware
Integration Notes:
- Connect HuskyLens via UART to MicroBit
- Use Scratch via Mind+ to trigger animations based on HuskyLens detections
- MeArm can simulate tagging or interacting with wildlife
🌱 Environmental Monitor Station
Purpose: Track temperature, air quality, and soil moisture
Controlled by: MicroBit + Kitronik Air Quality Board
Components:
- 🧠 MicroBit (sensor hub controller)
- 🌬️ Kitronik Air Quality Board
- Includes sensors for temperature, humidity, air quality
- 💧 Soil Moisture Sensor (attached to Air Quality Board or directly to MicroBit)
- 🔌 Power supply (battery pack or USB)
- 🪛 Mounting board or enclosure for outdoor simulation
Integration Notes:
- Sensor readings sent wirelessly to control MicroBit
- Scratch animation updates in real time based on environmental data
- Students can simulate conservation alerts or habitat changes
can you create some Makecode to program a MicroBit using a Kitronik Robotic Board to drive motors and servos
Absolutely, David! Here’s a sample MakeCode program that controls both motors and servos using the Kitronik Robotics Board attached to a MicroBit. This setup assumes:
- Motors 1–4 drive the wheels of the Wildlife Tracker.
- Servos 1–4 control the joints of a MeArm robot arm.
- The program includes basic movement and arm positioning logic.
🧠 Program Overview
- Motors spin forward for 2 seconds, then stop.
- Servos move to preset angles to simulate arm movement.
- Loop repeats every 5 seconds.
🧰 MakeCode Blocks (Pseudocode Format)
// Setup
kitronik_robotics_board.setMotorPower(kitronik_robotics_board.Motors.MOTOR1, 50)
kitronik_robotics_board.setMotorPower(kitronik_robotics_board.Motors.MOTOR2, 50)
kitronik_robotics_board.setMotorPower(kitronik_robotics_board.Motors.MOTOR3, 50)
kitronik_robotics_board.setMotorPower(kitronik_robotics_board.Motors.MOTOR4, 50)

// Move forward
kitronik_robotics_board.motorOn(kitronik_robotics_board.Motors.MOTOR1, kitronik_robotics_board.Dir.FORWARD)
kitronik_robotics_board.motorOn(kitronik_robotics_board.Motors.MOTOR2, kitronik_robotics_board.Dir.FORWARD)
kitronik_robotics_board.motorOn(kitronik_robotics_board.Motors.MOTOR3, kitronik_robotics_board.Dir.FORWARD)
kitronik_robotics_board.motorOn(kitronik_robotics_board.Motors.MOTOR4, kitronik_robotics_board.Dir.FORWARD)

basic.pause(2000) // Move for 2 seconds

// Stop motors
kitronik_robotics_board.motorOff(kitronik_robotics_board.Motors.MOTOR1)
kitronik_robotics_board.motorOff(kitronik_robotics_board.Motors.MOTOR2)
kitronik_robotics_board.motorOff(kitronik_robotics_board.Motors.MOTOR3)
kitronik_robotics_board.motorOff(kitronik_robotics_board.Motors.MOTOR4)

// Move MeArm servos
kitronik_robotics_board.setServoAngle(kitronik_robotics_board.Servos.S1, 45)
kitronik_robotics_board.setServoAngle(kitronik_robotics_board.Servos.S2, 90)
kitronik_robotics_board.setServoAngle(kitronik_robotics_board.Servos.S3, 135)
kitronik_robotics_board.setServoAngle(kitronik_robotics_board.Servos.S4, 90)

basic.pause(3000) // Hold position

// Reset servos
kitronik_robotics_board.setServoAngle(kitronik_robotics_board.Servos.S1, 90)
kitronik_robotics_board.setServoAngle(kitronik_robotics_board.Servos.S2, 90)
kitronik_robotics_board.setServoAngle(kitronik_robotics_board.Servos.S3, 90)
kitronik_robotics_board.setServoAngle(kitronik_robotics_board.Servos.S4, 90)

basic.pause(2000)
🧪 Tips for Testing
- Use the Kitronik extension in MakeCode:
Go to Advanced → Extensions → Search “Kitronik Robotics Board” - Adjust motor power (0–100) and servo angles (0–180) based on your build.
- Add radio blocks if you want this MicroBit to receive commands from the Scratch interface or other MicroBits.
Would you like to add HuskyLens integration next, or build a command structure for responding to Scratch triggers? I can help scaffold that too.
yes can you please add the Husky Lens integration
Absolutely, David! Here’s how you can integrate the HuskyLens AI vision sensor into your MakeCode program for the Wildlife Tracker using the Kitronik Robotics Board. This setup allows the MicroBit to respond to wildlife detections and trigger motor or servo actions accordingly.
🧠 Overview of HuskyLens Integration
- HuskyLens uses UART (serial) to communicate with the MicroBit.
- It can be trained to recognize wildlife images (e.g., “elephant,” “lion,” “zebra”).
- When a known object is detected, the MicroBit triggers movement or MeArm gestures.
🧰 Required Extensions in MakeCode
- Kitronik Robotics Board
- HuskyLens Extension
→ In MakeCode, go to Advanced → Extensions → Search “HuskyLens”
🧱 Sample MakeCode Blocks (Pseudocode Format)
// Setup UART for HuskyLens
huskyLens.initI2c() // or huskyLens.initSerial() if using UART

// Start loop
basic.forever(function () {
    huskyLens.request()

    // Check if an object is detected
    if (huskyLens.objectAvailable()) {
        let label = huskyLens.readObject().label

        // Example: If label is "Elephant"
        if (label == "Elephant") {
            // Move forward
            kitronik_robotics_board.motorOn(kitronik_robotics_board.Motors.MOTOR1, kitronik_robotics_board.Dir.FORWARD)
            kitronik_robotics_board.motorOn(kitronik_robotics_board.Motors.MOTOR2, kitronik_robotics_board.Dir.FORWARD)
            basic.pause(1000)
            kitronik_robotics_board.motorOff(kitronik_robotics_board.Motors.MOTOR1)
            kitronik_robotics_board.motorOff(kitronik_robotics_board.Motors.MOTOR2)

            // Move MeArm to "tag" the animal
            kitronik_robotics_board.setServoAngle(kitronik_robotics_board.Servos.S1, 45)
            kitronik_robotics_board.setServoAngle(kitronik_robotics_board.Servos.S2, 90)
            basic.pause(1000)
            kitronik_robotics_board.setServoAngle(kitronik_robotics_board.Servos.S1, 90)
            kitronik_robotics_board.setServoAngle(kitronik_robotics_board.Servos.S2, 90)
        }
    }
})
🧪 Tips for Setup
- Train HuskyLens to recognize wildlife images beforehand (via PC or onboard training).
- Connect HuskyLens to MicroBit via UART (TX/RX pins) or I2C depending on your board’s compatibility.
- Use radio blocks if you want to send detection info to the Scratch interface or environmental monitor.
Would you like help designing a Scratch animation that responds to these detections in real time? We could simulate animal sightings, conservation alerts, or even trigger sound effects and storytelling elements.
yes could you create a Scratch animation
Absolutely! Here’s a concept for a Scratch animation that brings your African Nature Reserve project to life—designed to integrate with the MicroBit + HuskyLens setup and reflect real-time wildlife detection and environmental monitoring.
🎬 Scratch Animation: Wildlife Watchers – Nature Reserve Explorer
🖼️ Scene Setup
- Backdrop: Illustrated African savannah with trees, grass, and a watering hole (created by the Arts group)
- Sprites:
- 🐘 Elephant
- 🦁 Lion
- 🦓 Zebra
- 🌡️ Sensor Station (animated icon for temperature, air quality, soil moisture)
- 🚗 Tracker Robot (animated to move across the screen)
- 🧑 Ranger (optional narrator sprite)
🧠 Animation Logic
1. Wildlife Detection (via HuskyLens + MicroBit)
- MicroBit sends a radio message like
"Elephant detected"when HuskyLens identifies an animal. - Scratch receives the message and:
- Shows the corresponding animal sprite
- Plays a sound (e.g., elephant trumpet)
- Displays a message:
"Elephant spotted near the watering hole!" - Moves the Tracker Robot sprite toward the animal
2. Environmental Monitoring (via Air Quality MicroBit)
- MicroBit sends sensor data as radio messages:
"Temp: 32°C","Air: Moderate","Soil: Dry"
- Scratch updates the Sensor Station sprite:
- Changes icons or colors based on readings
- Displays alerts like
"Soil moisture low – consider irrigation!"
3. Story Integration
- Ranger sprite narrates the story:
"Today, our robot spotted a lion near the acacia tree!""The air quality is improving thanks to recent rains."
- Story evolves based on real-time data and sprite interactions
🧰 Scratch Code Snippets (Block Logic)
🟦 Receiving Wildlife Detection
when I receive [Elephant detected v]
show
play sound [Elephant trumpet v]
say [Elephant spotted near the watering hole!] for 2 seconds
🟩 Updating Sensor Station
when I receive [Soil: Dry v]
switch costume to [Dry Soil v]
say [Soil moisture low – consider irrigation!] for 2 seconds
🟨 Tracker Robot Movement
when I receive [Elephant detected v]
glide 2 secs to [Elephant sprite position]
🧪 Tips for Integration
- Use radio blocks in MicroBit MakeCode to send messages to Scratch via Mind+
- Use broadcast blocks in Scratch to trigger animations
- Add costume changes and sound effects for engagement
- Encourage students to write their own narration or dialogue
Would you like help turning this into a storyboard or printable guide for your students? I can also help scaffold the Scratch project file with labeled sections for each group to build collaboratively.
can you create a printable guide for students
Absolutely, David! Here’s a student-friendly, printable-style guide for your Wildlife Watchers – Nature Reserve Explorer project. It’s designed to be clear, engaging, and modular—perfect for classroom use, Innovation Centre kits, or international collaboration.
🐾 Wildlife Watchers
STEAM + AI Project Guide
Explore, Create, and Protect in a Virtual African Nature Reserve
🔍 Project Mission
You’ll work in rotating teams to build a Scratch animation that connects to real MicroBit-powered robots and sensors. Together, you’ll simulate wildlife tracking and environmental monitoring—just like real conservation scientists!
👥 Team Roles & Activities
You’ll rotate through these four teams to learn different skills and contribute to the final project.
| Team | What You’ll Do | Tools You’ll Use |
|---|---|---|
| 🎨 Arts & Storytelling | Design background and animal sprites. Write a story based on wildlife sightings. | Scratch graphics editor, sketchpads, digital art |
| 💻 Programming | Build a Scratch animation using Mind+. Connect it to a MicroBit that talks to other MicroBits. | Scratch + Mind+, MicroBit |
| 🤖 Robotics A: Wildlife Tracker | Build a robot car with an AI camera to detect animals. Control motors and a MeArm arm. | MicroBit, Kitronik Robotics Board, HuskyLens, MeArm |
| 🌱 Robotics B: Environment Monitor | Build a station that tracks temperature, air quality, and soil moisture. | MicroBit, Kitronik Air Quality Board, moisture sensor |
🧠 How It All Works
- The HuskyLens camera spots animals and sends messages to Scratch.
- The Environment Monitor sends sensor data to Scratch.
- Scratch shows animations, plays sounds, and tells a story based on what’s happening in the nature reserve.
🎬 Scratch Animation Features
- 🐘 Animal sprites appear when detected
- 🌡️ Sensor station updates with real-time data
- 🚗 Robot sprite moves across the screen
- 🧑 Ranger sprite narrates the story
🛠️ What You’ll Learn
- How AI and robotics help protect nature
- How to code with Scratch and MicroBit
- How to design characters and tell stories
- How to work as a team and share ideas
🧪 Getting Started
- Join your first team and explore the tools
- Help build your part of the project
- Rotate to a new team and learn something new
- Test everything together
- Share your final animation and story!
📝 Notes & Ideas
Use this space to sketch, write, or plan your contributions:
My favorite animal to include:
A cool sensor idea I want to try:
A story moment I’d love to animate:
Would you like a matching teacher guide or visual storyboard next? I can also help adapt this for multilingual use or printable posters for your Innovation Centre.
can you create the Scratch, Makecode, to read environmental conditions using a Kitronik Air Quality Sensor
Absolutely, David! Here’s a complete guide to programming a MicroBit using MakeCode to read environmental conditions from the Kitronik Air Quality Board, and then sending that data to Scratch via Mind+ for real-time animation and storytelling.
🧰 What You’ll Need
- MicroBit
- Kitronik Air Quality Board
- Soil moisture sensor (connected to pin P1 or P2)
- Mind+ installed on your computer
- Scratch project with sprites ready to receive data
🧱 Step 1: Set Up MakeCode
🔧 Add Extensions
In MakeCode:
- Go to Advanced → Extensions
- Search for Kitronik Air Quality Board
- Add the extension to your project
🧠 Sample MakeCode Program
This program:
- Reads temperature, humidity, air quality, and soil moisture
- Sends data via radio to Scratch running in Mind+
// Setup radio group
radio.setGroup(1)

// Forever loop to read and send sensor data
basic.forever(function () {
    // Read temperature and humidity
    let temp = kitronik_air_quality.readTemperature()
    let humidity = kitronik_air_quality.readHumidity()

    // Read air quality (TVOC)
    let airQuality = kitronik_air_quality.readTVOC()

    // Read soil moisture from analog pin P1
    let moisture = pins.analogReadPin(AnalogPin.P1)

    // Send data to Scratch
    radio.sendString("Temp:" + temp + "C")
    radio.sendString("Humidity:" + humidity + "%")
    radio.sendString("Air:" + airQuality + "ppm")
    radio.sendString("Soil:" + moisture)

    // Pause before next reading
    basic.pause(5000)
})
🧩 Step 2: Scratch Setup in Mind+
In Mind+, connect your MicroBit and switch to Scratch mode.
🟦 Scratch Blocks to Receive Data
Use the following logic in Scratch:
when I receive [Temp:32C]
set [temperature v] to (32)
say [Temperature is 32°C] for 2 seconds

when I receive [Soil:450]
if <(450) < (300)> then
    say [Soil is dry – time to water!] for 2 seconds
else
    say [Soil moisture is good!] for 2 seconds
You can also:
- Change costumes of a Sensor Station sprite
- Trigger animations or alerts
- Add narration from a Ranger sprite
🧪 Tips for Testing
- Use the Serial Monitor in MakeCode to verify sensor readings
- Adjust radio group if multiple MicroBits are used
- Calibrate soil moisture values based on your sensor and soil type
Would you like a printable wiring diagram or Scratch storyboard to go with this? I can also help scaffold the Scratch project file so students can plug in their own sprites and story elements.
Can you create a wiring diagram for the complete project
Absolutely, David! Here’s a detailed wiring diagram description for your full Wildlife Watchers – STEAM + AI project, integrating all components across the four student teams. This layout ensures clarity for classroom builds and can be adapted into printable guides or posters for your Innovation Centre.
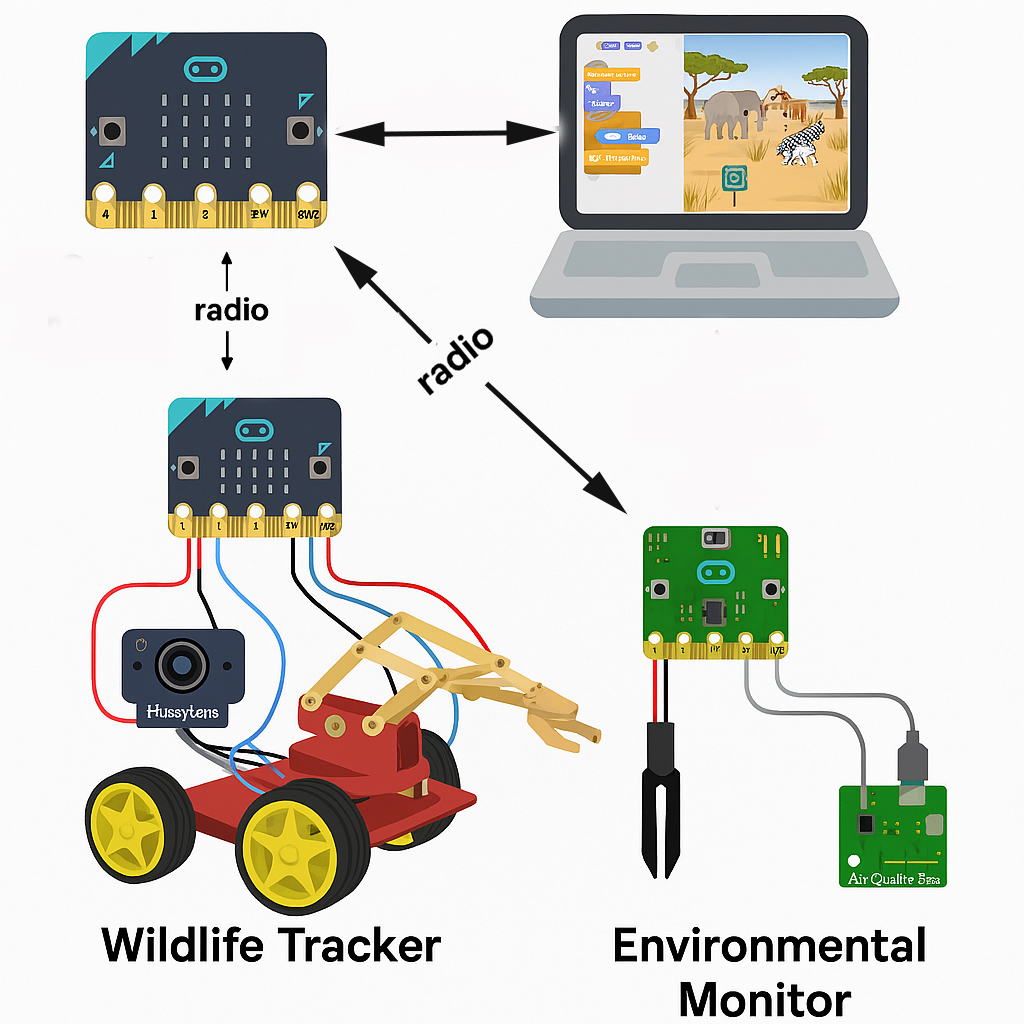
🧭 Wiring Diagram Overview
The project includes three main MicroBit setups:
- Wildlife Tracker Robot
- Environmental Monitor Station
- Control MicroBit (connected to Scratch via Mind+)
Each MicroBit communicates wirelessly via radio, and each setup has its own dedicated hardware.
🤖 1. Wildlife Tracker Robot
MicroBit + Kitronik Robotics Board + HuskyLens + MeArm
Connections:
- MicroBit inserted into the Kitronik Robotics Board
- Motors (M1–M4) connected to motor terminals on the board (for robot movement)
- Servos (S1–S4) connected to servo ports (for MeArm joints)
- HuskyLens AI Camera connected via UART:
- TX (HuskyLens) → P1 (MicroBit)
- RX (HuskyLens) → P2 (MicroBit)
- GND → GND
- VCC (5V) → External 5V power source (not from MicroBit directly)
Power:
- Robotics Board powered via battery pack (6V–9V recommended)
- HuskyLens powered separately if needed (via USB or regulated 5V)
🌱 2. Environmental Monitor Station
MicroBit + Kitronik Air Quality Board + Soil Moisture Sensor
Connections:
- MicroBit inserted into the Air Quality Board
- Soil Moisture Sensor:
- Signal → P1 (MicroBit)
- VCC → 3V (MicroBit)
- GND → GND
Sensors on Air Quality Board:
- Temperature & Humidity via onboard DHT11
- Air Quality (TVOC & eCO2) via onboard gas sensor
Power:
- Air Quality Board powered via USB or battery pack (3V–5V)
💻 3. Control MicroBit (Scratch Interface)
MicroBit connected to laptop via USB, running Mind+
Connections:
- MicroBit connected via USB to laptop
- Mind+ running in Scratch mode
- Radio Group set to match other MicroBits (e.g., group 1)
Function:
- Receives radio messages from Tracker and Monitor
- Sends commands to Scratch to trigger animations and sprite changes
📡 Wireless Communication Flow
[Wildlife Tracker MicroBit] → radio → [Control MicroBit] → Scratch
[Environmental Monitor MicroBit] → radio → [Control MicroBit] → Scratch
All MicroBits must use the same radio group (e.g., radio.setGroup(1) in MakeCode).
🧪 Optional Additions
- LED indicators on each board to show status (e.g., detection, data sent)
- Push buttons for manual override or testing
- Speaker module for sound alerts (connected to P0 or P3)
Would you like this translated into a visual diagram next—with labeled arrows, color-coded wires, and sprite references? I can also help create a printable classroom poster or modular build cards for each team.
Can you produce a visual diagram
Note: I needed to make a few minor adjustments to the interface arrows. Its not perfect but is a reasonable pictorial view.
I’ll use Copilot to create images of the scene
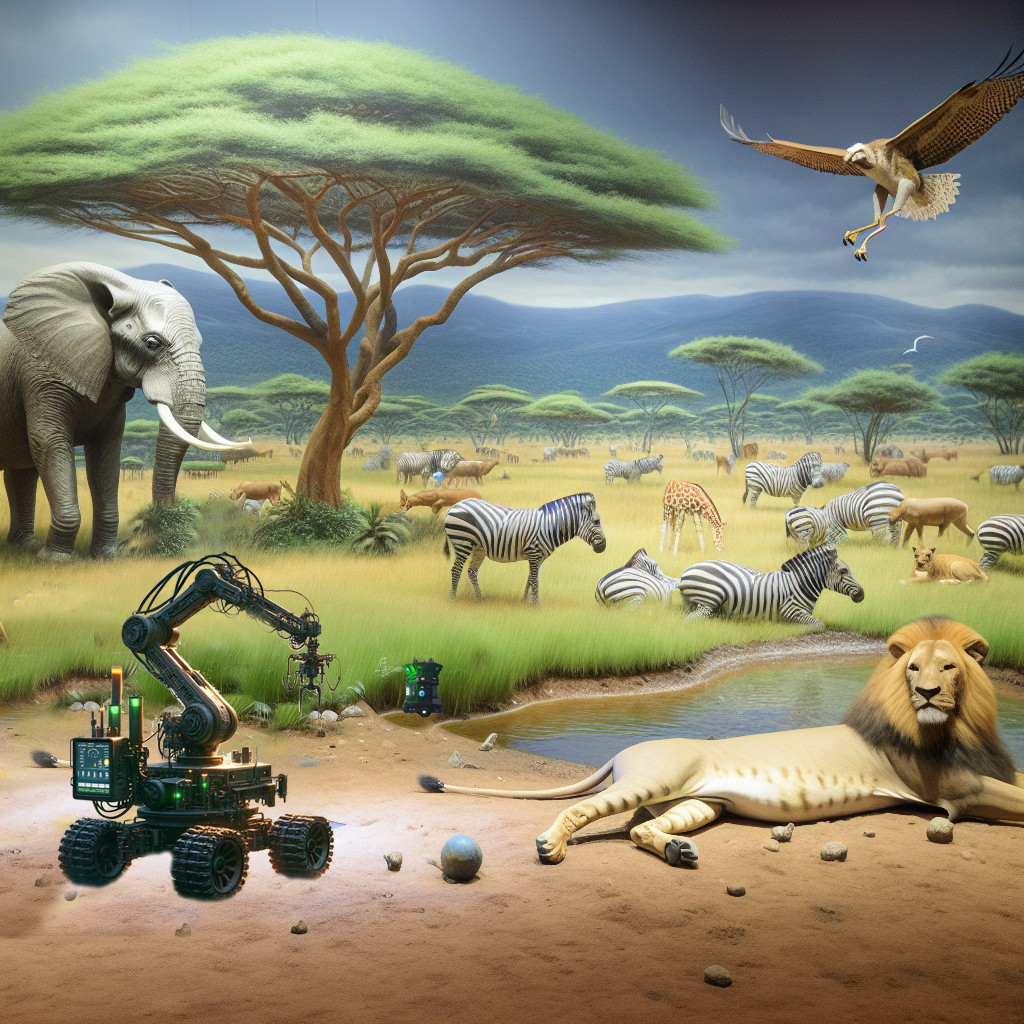
Can you create an image of the Africa scene with the robots and animals. It is to be used as a background for Scratch and a wall poster.

I’ve created an alternative image using AI. Deepdream AI was used to create the background and enhance photographs of my robot and environmental monitor. The robot and monitor can be used as sprites within Scratch.
Let us create a lesson plan using Magic School (AI for teachers). Note: I’ve not included the updated robotics list of components.
AI Generated Title for the Lesson: Environmental Monitoring through STEAM and AI
LEARNING OBJECTIVE:
Students will be able to collaborate in groups to design and create a project using Scratch and MicroBits, focusing on environmental monitoring in an African Nature Reserve.
ASSESSMENTS:
Students will present their projects, demonstrating the functionality of their Scratch programs and MicroBit interactions, as well as the artistic components they created.
KEY POINTS:
- Understanding the role of AI in wildlife monitoring and environmental data collection.
- Familiarity with Scratch programming and its integration with MicroBits.
- Importance of collaboration in a project-based learning environment.
- Creative storytelling through images and sprites in a digital format.
- Basics of environmental monitoring, including temperature, air quality, and soil moisture.
OPENING:
- Begin with a discussion on the importance of wildlife conservation and how technology can aid in this effort.
- Show a short video on wildlife monitoring using AI technologies to capture students’ interest.
- Pose the question: “How can we use technology to help protect wildlife and monitor the environment?”
INTRODUCTION TO NEW MATERIAL:
- Discuss the components of the project, including the roles of each group (Arts, Programming, and Robotics).
- Introduce Scratch programming and MicroBits with demonstrations.
- Explain how each MicroBit will be used in the project.
- Anticipate the misconception: “Programming is only for computer experts,” and clarify that anyone can learn to code with practice and collaboration.
GUIDED PRACTICE:
- Assign students to their groups and provide them with specific tasks related to their roles.
- Scaffold questions like: “What type of wildlife will you focus on?” for the Arts group, and “How will the MicroBit communicate with the Scratch program?” for the Programming group.
- Monitor group discussions and provide feedback as they begin sketching their ideas and plans.
INDEPENDENT PRACTICE:
- Each group will work on their project components independently while adhering to behavioral expectations of collaboration and respect.
- The Arts group will create their background images and sprites; the Programming group will develop their Scratch program; the Robotics groups will build and program their MicroBits for wildlife identification and environmental monitoring.
CLOSING:
- Each group will present their progress to the class, highlighting their designs and how they plan to integrate them into the final project.
- Conclude with a reflection question: “What challenges did you face during your project work today?”
EXTENSION ACTIVITY:
- Students who finish early can research additional technologies used in environmental monitoring and create a short presentation or infographic to share with the class.
HOMEWORK:
- Students will write a one-page reflection on how technology impacts environmental conservation and what they learned during the project.
STANDARDS ALIGNED:
- ISTE Standard 5: Computational Thinking – Students develop and employ strategies for understanding and solving problems in ways that leverage the power of technological methods.
- Next Generation Science Standards (NGSS) MS-ESS3-3: Apply scientific principles to design a method for monitoring and minimizing human impact on the environment.
Including the new robotics parts list
Here’s the updated parts list for the robotics components in the lesson plan:
Updated Robotics Parts List
Wildlife Tracker:
- Kitronik Robotics Board: Controls the motors and servos.
- 4 Motors: To drive the Wildlife Tracker.
- 4 Servos: For the MeArm robot arm functionality.
- Huskylens Vision Sensor: For wildlife identification.
Environmental Monitor:
- Kitronik Air Quality Board: For monitoring environmental conditions.
- Moisture Monitor: Attached to monitor soil moisture levels.
This updated parts list should enhance the functionality of the projects and provide students with hands-on experience using advanced robotics components.
can you create some Makecode to program a MicroBit using a Kitronik Robotic Board to drive motors and servos
Here’s a basic example of how to program a MicroBit using MakeCode to control motors and servos with a Kitronik Robotics Board. This code will drive the motors for the Wildlife Tracker and control the servos for the MeArm robot arm.
MakeCode Program for MicroBit with Kitronik Robotics Board
- Open MakeCode: Go to MakeCode for MicroBit.
- Create a New Project: Start a new project.
- Add Blocks:
- Use the following blocks to create the program:
Basic Code Structure
// Initialize variables for motor and servo control
let motorSpeed = 100 // Speed for the motors
let servoPosition = 0 // Initial position of the servo
// Set up the Kitronik Robotics Board
kitronik_init();
// Drive Forward
function driveForward() {
kitronik_motor(Motor.M1, motorSpeed);
kitronik_motor(Motor.M2, motorSpeed);
}
// Drive Backward
function driveBackward() {
kitronik_motor(Motor.M1, -motorSpeed);
kitronik_motor(Motor.M2, -motorSpeed);
}
// Stop Motors
function stopMotors() {
kitronik_motor(Motor.M1, 0);
kitronik_motor(Motor.M2, 0);
}
// Control Servo
function moveServo(position: number) {
kitronik_servo(Servo.S1, position);
}
// Main Loop
basic.forever(function () {
// Example: Drive forward for 2 seconds
driveForward();
basic.pause(2000);
// Stop Motors
stopMotors();
basic.pause(1000);
// Move Servo to position 90
moveServo(90);
basic.pause(1000);
// Move Servo back to position 0
moveServo(0);
basic.pause(1000);
// Drive backward for 2 seconds
driveBackward();
basic.pause(2000);
// Stop Motors
stopMotors();
basic.pause(1000);
});
Explanation of the Code
- Initialization:
- The program initializes the motors and servos connected to the Kitronik Robotics Board.
- Functions:
- driveForward(): Drives the motors forward at the specified speed.
- driveBackward(): Drives the motors backward.
- stopMotors(): Stops both motors.
- moveServo(position): Moves the servo to a specified position.
- Main Loop:
- The basic.forever function runs continuously, executing the driving and servo commands in sequence.
How to Use:
- Copy the provided code into the MakeCode editor.
- Connect your MicroBit to the Kitronik Robotics Board and upload the code.
- Test the program with your hardware setup to observe the movements of the motors and servos.
Feel free to modify the motor speeds and timings to fit your project needs!
Note on AI comparisons.
Magic School is a collection of AI Assisted tools aimed at teachers and students. There are two Microsoft Copilots: Copilot and Copilot Github. Microsoft Copilot is very good at identifying and analysing things typically stored on Github such as technology and coding components. It is therefore not possible to make any real comparisons between Copilot and Magic School based on this one trial.
